
Boost Photoshop Performance: Clear Your Scratch Disks with Ease
Within Adobe Photoshop, scratch disks play a vital role in managing the program’s temporary storage requirements during various operations and tasks. Whether you’re engaged in editing, applying filters, or handling resource-intensive processes, Ps relies on additional memory to store and manipulate data effectively.
Functioning as a virtual workspace within Ps, the disk serves as a temporary storage solution for files and data that exceed the available Random Access Memory (RAM). Particularly when working with large image files or multiple open files simultaneously, this space becomes indispensable for maintaining efficient operation. It enables the program to offload certain data from RAM to the hard disk, preventing excessive memory usage and ensuring smooth functionality.
What Is a Scratch Disk?
A scratch disk is a storage space on your computer’s hard drive, which Photoshop utilizes to process various operations and procedures. You can configure it to use multiple SSDs or partitions as digital storage space, with the boot drive set as the primary drive by default.
It’s crucial to have a spacious and fast disk for the program to operate efficiently. If the digital space is overcrowded or fragmented, it can slow down the performance.
It’s recommended that you maintain sufficient free space and defragment regularly. It’s important to note that the hard drive isn’t used to store the actual image files; instead, it temporarily saves data during an editing session. The edited files are saved in the location you specify when you save the document.
Scratch Disk Types
Adobe Photoshop offers various scratch disk options to cater to different user needs. Here’s an overview of the most common types:
- Internal Hard Drive: By default, Photoshop utilizes your computer’s internal hard drive as the primary scratch disk. Whether it’s a solid-state drive (SSD) or a traditional hard disk drive (HDD), this option works well for most users, provided the drive has ample free space and offers satisfactory speed;
- External Hard Drive: When working with large files or requiring extra storage, designating an external hard drive can be advantageous. Ensure the external drive is connected to your computer before launching the program, as connecting it later may lead to recognition issues;
- Additional Internal Hard Drive or Partition: If your computer boasts multiple internal hard drives or partitions, you have the flexibility to assign one of them as a supplementary storage capacity option. Opting for a separate disk or partition with generous free space can distribute the workload and enhance the performance;
- Network Disk: While Ps permits the use of network drives as scratch disks, it’s generally not recommended due to potential performance drawbacks. Network drives tend to be slower than local drives, adversely affecting Photoshop’s efficiency. If you choose to utilize a network drive, ensure it maintains a stable and fast connection.
To configure the settings in Photoshop, navigate to the “Preferences” menu and access the “Scratch Disks” section. From there, you can select the desired drive or drives and establish their order of preference.
Photoshop will prioritize the assigned scratch disks according to the specified order, utilizing the first one available with sufficient free space. Tailoring your setup optimally enhances the performance and ensures seamless editing experiences.
Determining the Appropriate Scratch Disk Space for Adobe Photoshop
Adobe Photoshop requires space to store temporary data when editing images. The amount of space needed depends on various factors. Here are some considerations to help determine the required disk space:
- Image size: Larger image files require more space on the scratch drive;
- Number of open files: Each open file takes up additional space;
- Editing tasks: Complex editing tasks such as applying filters, using multiple layers, 3D functions, or running resource-intensive plug-ins can generate a lot of temporary data;
- Available RAM: Scratch disk usage increases when Photoshop’s RAM capacity is exhausted.
To ensure seamless operation, Adobe recommends allocating at least three to five times the size of your largest image file as scratch disk space. It is also advisable to have more free space than the minimum requirements to accommodate unexpected spikes in temporary data and prevent performance slowdowns.
Here are some drives that are not recommended for use as scratch disks:
- USB flash drives;
- Any USB-2 drive;
- Disks formatted to NTFS in macOS.
Regularly monitoring the available space and keeping it clean will help keep the program efficient. Consider allocating more storage space if working with large files or performing memory-intensive tasks.
Note that the appropriate amount of capacity depends on various factors, and it is essential to allocate enough space to ensure optimal performance while using Adobe Photoshop.
Optimal Settings for Adobe Photoshop
For seamless performance, especially when working with large files or running memory-intensive tasks, when using Ps, you need to set up your scratch disk properly. This will help reduce the likelihood of slowdowns or the “Scratch Disk Full” error. Below are some recommended settings to optimize the performance.
Connect scratch disks to the highest bandwidth limit port:
- Thunderbolt = 10 GB/sec;
- eSATA = 600 MB/s;
- PCIe = 500MB/sec;
- USB3 = 400MB/sec.
Use a defragmented hard drive with high read/write speeds and lots of unused space as the primary destination for better performance.
If you have more than one hard drive, you can specify extra destination. Photoshop supports up to 64 exabytes of data storage space on four volumes.
If your boot drive is a hard drive, try using a different hard drive as your primary scratch drive. Alternatively, an SSD works well as both a primary boot drive and a scratch drive.
Allocating RAM to Free Space
The tool allows you to allocate more RAM to free up space by changing your memory allocation settings. By increasing the amount of RAM available, Photoshop can rely less on space, resulting in improved performance.
Here’s how to allocate more RAM in Ps:
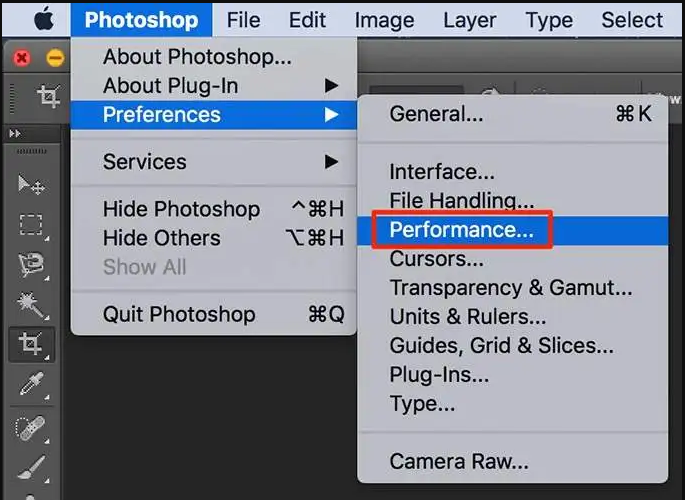
- Open the program and go to the “Edit” menu (in Windows) or “Photoshop” menu (in macOS);
- From the drop-down menu, choose “Preferences” and then “Performance”;
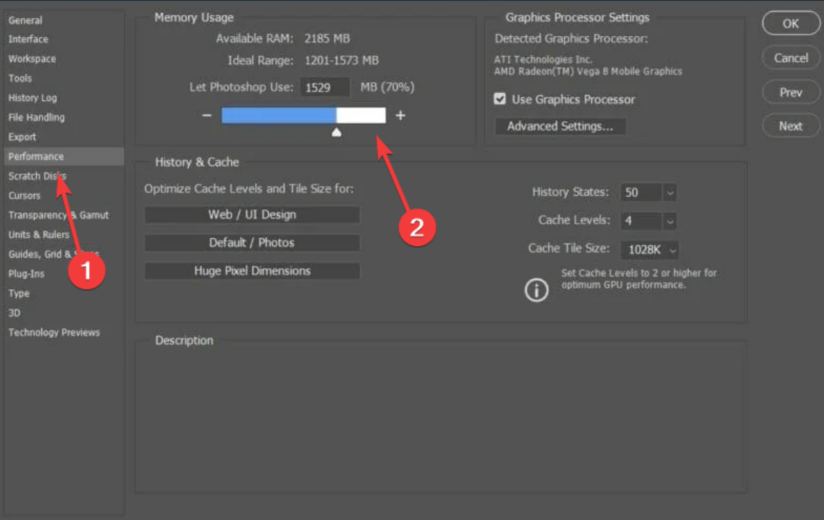
- In the “Performance Options” window, you’ll find the “Memory Usage” section;
- Under “Memory Usage,” you’ll see a slider labeled “Allow Photoshop to use.” By default, it is set to a certain percentage of available RAM;
- Adjust the slider to allocate more RAM. The recommended range is usually 60-70% of available RAM;
- After adjusting the slider, click the “OK” button to save your changes.
It’s worth noting that allocating more RAM to Photoshop means that less RAM will be available for other applications running on your computer. However, it can help reduce Ps’s reliance on storage space, leading to improved performance.
When allocating RAM, it’s crucial to consider the available memory on your system. While assigning a significant portion to Ps may seem beneficial, it’s important to strike a balance to avoid compromising overall performance. Take into account the limitations of your hardware and determine an allocation that suits your needs.
To further enhance performance, optimizing your zero disk settings is essential. Ensure that you have sufficient free space and utilize fast hard drives. This optimization can have a significant impact on efficiency, enabling smoother operations and improved responsiveness.
Harnessing the Status Bar: Evaluating Efficiency and Scratch Size
To assess the efficiency and scratch size in Adobe’s image-editing software, you can utilize the status bar, which provides valuable information. Here’s a step-by-step guide on using the status bar to check these metrics:
- Launch Adobe Photoshop and open an image or create a new document;
- Locate the status bar positioned at the bottom of the interface. It offers various details and statistics about your document and the application;
- By default, the status bar presents basic information such as document size, resolution, and color mode. To access scratch disk information, you need to enable additional options in the status bar;
- Right-click on the status bar to unveil a context menu featuring a list of available options. Select the options related to scratch disks. The specific choices may vary based on your Ps version, but typically include “Efficiency” and “Scratch Size”.
Once chosen, the status bar will reveal supplementary details:
- Efficiency: This option signifies the efficiency of Photoshop’s temporary data storage on scratch drives. It is often displayed as a percentage, indicating the level of performance. Higher percentages denote greater efficiency;
- Size: This indicates the size of each utilized scratch disk, representing the amount of space consumed on each one. Size is usually measured in kilobytes (KB), megabytes (MB), or gigabytes (GB).
By monitoring the efficiency and size of scratch drives through the status bar, you can evaluate their performance and determine whether adjustments or optimizations are necessary. This helps ensure smooth operations and efficient memory management while working with large files or executing resource-intensive tasks in Ps.
Remember to regularly monitor the status bar to stay informed about the efficiency and memory usage on scratch drives, enabling you to make informed decisions during your Photoshop endeavors.
Overcoming the “Scratch Disk Full” Error: Effective Solutions
The “Scratch Disk Full” error message appears in Adobe Photoshop when the designated scratch drive lacks sufficient free space to accommodate the temporary data generated during your editing session. This occurs when Ps encounters difficulties writing or accessing the necessary temporary files on disk zero.
To resolve this issue and regain smooth operation, consider implementing the following solutions:
- Free up space: Clear unnecessary files from the zero drive(s) to create more available space. It is safe to delete temporary files, data from previous Photoshop projects, and any unused files. Additionally, consider moving unnecessary files to alternative storage locations or permanently deleting them;
- Increase space: If you have multiple drives or partitions, allocate them as additional scratch disks in the settings. This allows the system to distribute the temporary data across multiple disks, reducing the likelihood of encountering the error;
- Specify an alternative storage location: If the current scratch disk lacks sufficient space, select another drive or partition with more free space as the primary scratch location in the settings. By doing so, you ensure that Ps has ample room to store the temporary data without interruptions;
- Optimize the usage: Ps provides options to optimize scratch drive performance. You can modify the order in which scratch disks are assigned, prioritizing those with greater available space. Regularly defragmenting your drives also aids performance by minimizing fragmentation and maximizing free space.
By effectively managing scratch space and ensuring a suitable amount of free space, you can prevent the occurrence of the error, enabling the uninterrupted and seamless operation of Adobe Photoshop.
Clearing Scratch Drive in Adobe Photoshop: Step-by-Step Guide
To empty the scratch disk in Adobe Photoshop, simply follow these step-by-step instructions:
- Launch the tool on your computer;
- Navigate to the “Edit” menu (on Windows) or the “Photoshop” menu (on macOS);
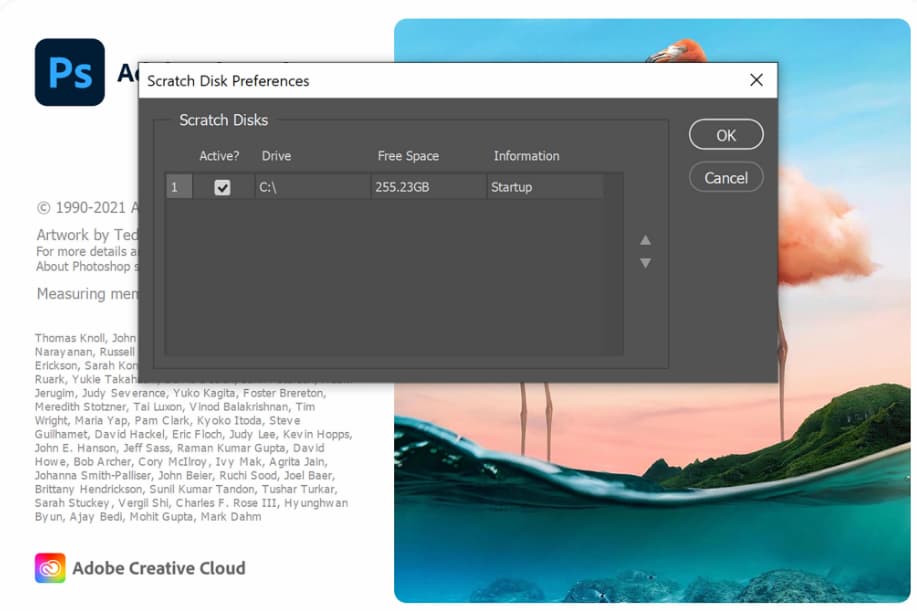
- From the drop-down menu, select “Preferences” and then choose “Scratch Disks”;
- In the “Scratch Disks Options” window, you will find a list of available drives and partitions that can be designated as scratch drives;
- Uncheck the box next to the disk or partition you wish to clear. This action ensures that Ps will no longer utilize that specific drive for temporary storage. If you have multiple drives listed, repeat step 5 for each drive or partition you want to free;
- Once unchecked, click “OK” to save your changes.
By unchecking the designated drives or partitions in the Scratch Disk Settings, you effectively remove them as assigned scratch disks. This frees up space on them, as the system will no longer use them for temporary storage.
It is important to note that the clearing process does not affect your original image files or saved Ps projects. This process solely removes the temporary data generated during editing sessions.
After the clearing process, it is advisable to regularly monitor the available free space and ensure they have adequate capacity.
Optimize Your System by Maintaining a Clean Photoshop Cache
To optimize your system and avoid the accumulation of unnecessary temporary files, it is recommended to regularly clean up the Photoshop cache. Follow these step-by-step instructions to clear the cache and delete temporary files:
- Close the program if it is currently open;
- Locate the Ps cache folder on your computer. The cache folder’s path varies depending on your operating system. For Windows, the default path is typically: C:\Users[your username]\AppData\Local\Temp\Photoshop Temp. For macOS, the default path is generally: /Users/[your username]/Library/Caches/Adobe/Photoshop Temp;
- Open the cache folder. Inside, you will find multiple files and folders representing temporary data;
- Select all the files and folders within the cache folder;
- Delete the selected files and folders. You can accomplish this by pressing the “Delete” key on your keyboard or by right-clicking and choosing “Move to Trash” (macOS) or “Delete” (Windows) from the context menu;
- Empty the Trash (macOS) or Recycle Bin (Windows) to permanently erase the files.
By following these steps, you can effectively clear the cache and eliminate the temporary files created during your editing sessions. This process helps free up valuable disk space and may potentially enhance the performance.
Furthermore, you have the option to configure the program to manage the cache size automatically and delete older cache files. To do so, access the “Edit” menu (Windows) or “Photoshop” menu (macOS), select “Preferences,” navigate to “Performance,” and adjust the settings under “Cache Levels” and “Cache Tile Size”.
Keeping your cache clean in Ps ensures a streamlined workflow and optimal utilization of system resources.
Boosting Performance and Storage Efficiency in Photoshop
There are various scenarios where transferring a Photoshop scratch disk to another drive becomes necessary. Consider the following situations:
- Insufficient Free Space: If your current storage space lacks adequate free space, it can hinder Photoshop’s performance. Moving the scratch disk to a drive with more available space ensures ample room for storing temporary data, eliminating “scratch disk full” errors;
- Performance Enhancement: When encountering sluggish performance, particularly with large files or memory-intensive tasks, relocating the scratch disk to a faster drive can significantly improve responsiveness. SSDs generally outperform traditional HDDs;
- Utilizing Multiple Storage Locations or Partitions: If your computer has multiple disks or partitions, redistributing scratch disks across different drives distributes the workload, leading to improved performance. This approach enables the software to utilize multiple disks simultaneously, thereby reducing the burden on each;
- Storage Optimization: As part of an overall storage organization strategy, you can move scratch disks to accommodate changes in your storage configuration or when adding new ones. By allocating specific storage locations for different purposes, you can optimize storage performance and management;
- Disk Failure or Upgrade: In the event of failure or an upgrade, it’s crucial to transfer scratch disks to a new or replacement destination. This ensures the uninterrupted operation of the program without experiencing crashes.
It’s essential to select a storage location or partition for transferring scratch disks, which offers sufficient free space, excellent performance characteristics, and stability. Additionally, remember to create proper backups of important data before making any modifications to your storage configuration.
By transferring scratch drives to alternative drives as required, you can optimize Photoshop’s performance, overcome storage limitations, and achieve seamless editing experiences.
Moving Photoshop Scratch Disks to a New Drive
If you’re experiencing slow performance in Adobe Photoshop or facing “Scratch Disk Full” errors due to a lack of free space, you can move the scratch drive to a different drive. This process also helps to distribute the workload across multiple disks or partitions and optimize storage performance.
Follow these next steps to relocate them to another drive.
Step 1: Close Adobe Photoshop
First, close the program if it’s currently running to avoid any issues during the transfer process.
Step 2: Identify the New Drive
Identify the new location or partition where you want to move the scratch disk. Ensure that the new option has enough free space, is connected, and is available on your computer.
Step 3: Locate the Current Scratch Disk
Open File Explorer (Windows) or Finder (Mac) and navigate to the current location of the scratch disk. By default, it’s usually located in the boot drive. However, the exact path may vary depending on your operating system and Ps version:
- For Windows: The default path is usually as follows: C:\Users[your username]\AppData\Local\Temp\Photoshop Temp;
- For macOS: The default path is usually /Volumes/[Startup Disk]/Users/[your username]/Library/Caches/Adobe/Photoshop Temp.
Step 4: Copy the Contents to the New Location
Copy the entire contents of the current folder on the boot drive to a new destination folder on the desired drive or partition. Once the content is copied, return to the original location of the folder and delete all files and folders in it. This step ensures that the system will no longer use the old disk.
Step 5: Update Options in Photoshop
Open the tool and go to the “Edit” menu (in Windows) or the “Photoshop” menu (in macOS). From the drop-down menu, choose “Preferences” and then “Scratch Disks.” In the “Options” window, select the new disk or partition. You can select multiple if desired. Set the order by dragging them up or down in the list. The uppermost option will be used as the primary scratch disk, followed by the others in that order. Finally, click the OK button to save your changes.
This process will ensure that the program has enough space to store temporary data and improve performance during editing sessions. Always ensure that the new disk has enough free space and is stable enough to keep Photoshop running efficiently.
Conclusion
Regularly emptying the storage space in Ps is crucial for optimizing system performance and preventing storage limitations. By following the provided steps to clear the cache, delete temporary files, and manage scratch disks, users can free up valuable space, enhance the program’s responsiveness, and ensure smooth editing experiences.
Remember to monitor and make necessary adjustments to maximize the efficiency of Adobe Ps.